Arion Miner Setup
This guide explains how to set up and run a Hippius storage miner.
Before running a miner, you need to set up and run a Hippius Blockchain Node. The blockchain node is required for on-chain registration and network participation.
📖 Please complete the Running Blockchain Node setup first, then return to this guide.
Prerequisites
You should have completed the Running Blockchain Node guide, which includes:
- Setting up the Hippius blockchain node
- Registering your coldkey or child node on-chain
System Requirements:
- Ubuntu 22.04+ (or similar Linux)
- 8GB+ RAM, 2+ CPU cores
- 2TB+ available storage
- Rust toolchain (for building)
- UDP ports open for Iroh P2P (see your deployment firewall rules; Ansible defaults to
11000:12000/udp)
1. Get the Miner Binary
Build from Source
# Clone repository
git clone https://github.com/thenervelab/arion.git
cd arion

# Build release binary
cargo build --release --bin miner

# Copy binary to system location
sudo mkdir -p /var/lib/hippius/miner
sudo cp ~/arion/target/release/miner /var/lib/hippius/miner/

# Binary is now available at: /var/lib/hippius/miner/miner
2. Get Node IDs
The miner needs the validator's and warden's P2P node IDs, along with your family ID (coldkey address):
export VALIDATOR_NODE_ID="185651f2fb19c919d40c3c58660cf463ebe7ded1c1a326eef4dad28292171cdb"
export WARDEN_NODE_ID="70d27c756b0f9a71fc89a6e571c9bdf9e63f8531e125714d0f164be0e11e6846"
# Replace with your coldkey SS58 address to receive incentives
export FAMILY_ID="<your-coldkey-ss58-address>"
Important: Without WARDEN_NODE_ID, the miner cannot authorize proof-of-storage challenges from the warden, resulting in failed audits and reputation penalties.
3. Configure the Miner
The miner communicates with the validator via P2P. The VALIDATOR_NODE_ID is the only required connection parameter. VALIDATOR_URL is legacy and not actively used.
Option A: Environment Variables
# Required for P2P communication
export VALIDATOR_NODE_ID="185651f2fb19c919d40c3c58660cf463ebe7ded1c1a326eef4dad28292171cdb"
export WARDEN_NODE_ID="70d27c756b0f9a71fc89a6e571c9bdf9e63f8531e125714d0f164be0e11e6846" # Required for PoS audits

# Miner configuration
export PORT=3001
export HOSTNAME=$(hostname -I | awk '{print $1}')
export STORAGE_PATH="/var/lib/hippius/miner/data"
export MAX_STORAGE=2000000000000  # 2TB in bytes
Option B: Config File (miner.toml)
# /var/lib/hippius/miner/miner.toml
port = 3001
hostname = "your.public.ip"
storage_path = "data"
max_storage = <Max_storage_Miners_Provide>
4. Create Data Directory
sudo mkdir -p /var/lib/hippius/miner/data
sudo chown -R $USER:$USER /var/lib/hippius/miner
5. Run the Miner
Direct Run
cd /var/lib/hippius/miner
export VALIDATOR_NODE_ID="185651f2fb19c919d40c3c58660cf463ebe7ded1c1a326eef4dad28292171cdb"
export WARDEN_NODE_ID="70d27c756b0f9a71fc89a6e571c9bdf9e63f8531e125714d0f164be0e11e6846"
export FAMILY_ID="<coldkey-SS58>"
export PORT=3001
export HOSTNAME="$(hostname -I | awk '{print $1}')"
export STORAGE_PATH="data"
export MAX_STORAGE=<Max_storage_Miners_Provide>
./miner
As Systemd Service (Recommended)
Create /etc/systemd/system/hippius-miner.service with the following content. Make sure to replace the placeholder values with your actual configuration:
[Unit]
Description=Hippius Miner
After=network.target
Wants=network.target

[Service]
Type=simple
User=ubuntu
WorkingDirectory=/var/lib/hippius/miner
Environment="RUST_LOG=info"

# Iroh networking (hippius relay)
Environment="IROH_RELAY_URL=https://relay.hippius.com"

# API Key (matches validator)
Environment="ARION_API_KEY=Arion"

# Storage capacity (in GB)
Environment="STORAGE_CAPACITY_GB=100"

# All node-specific configurations are passed as command-line arguments
# to avoid duplication and ensure consistency
ExecStart=/usr/local/bin/hippius/miner \
    --validator-node-id 185651f2fb19c919d40c3c58660cf463ebe7ded1c1a326eef4dad28292171cdb \
    --warden-node-id 70d27c756b0f9a71fc89a6e571c9bdf9e63f8531e125714d0f164be0e11e6846 \
    --family-id <coldkey-SS58> \
    --storage-path /var/lib/hippius/miner/storage \
    --port 3001

Restart=always
RestartSec=10

[Install]
WantedBy=multi-user.target
The validator and warden node IDs provided in this documentation are the current production values. If these values change, the documentation will be automatically updated. Always use the values provided in the latest version of this documentation.
Enable and start:
sudo cp miner /usr/local/bin/hippius/
sudo systemctl daemon-reload
sudo systemctl enable hippius-miner
sudo systemctl start hippius-miner
When the miner starts, it will generate a keypair and print the miner node ID to the logs. You will need this node ID for on-chain registration in the next step.
Check the logs to find your miner node ID:
journalctl -u hippius-miner -f | grep "node_id"
6. Register Miner in Arion Pallet
The miner must be registered in the Arion pallet before it can join the network and start mining. Without registration, you will see:
FAMILY_REJECTED:node_id not registered on-chain (...)
Before registering your miner in the Arion pallet, you need to have a registered coldkey. Please follow the coldkey registration steps in the blockchain node guide:
📖 Follow the Coldkey Registration Guide
This includes:
- Registering your coldkey (main account)
- Optionally setting up a child account with proxy if needed
Complete the coldkey registration first, then return here to register your miner in the Arion pallet.
Miner Registration in Arion
After completing the blockchain node registration (coldkey or hotkey), proceed with registering your miner:
Step 1: Get the Miner Node ID
Get the miner node ID from the logs (printed when miner started):
journalctl -u hippius-miner -f | grep "node_id"
# Copy the node_id value from the output
Step 2: Generate Miner Registration Signature
To register your miner in the Arion pallet, you need to generate a cryptographic signature using the miner's keypair.
First, build the registration tool (if not already done):
# Navigate to the rion repository root
cd /path/to/arion

# Build the tools package with the registration data generator
cargo build --release -p tools --bin generate_registration_data

# Binary will be at: target/release/generate_registration_data
Ensure your miner keypair has secure permissions:
# Check current permissions
ls -la /var/lib/hippius/miner/data/keypair.bin

# Set secure permissions (owner read/write only)
chmod 600 /var/lib/hippius/miner/data/keypair.bin
Generate the registration data:
# Generate registration data for your miner
./target/release/generate_registration_data \
  --family <YOUR_FAMILY_ACCOUNT> \
  --child <YOUR_CHILD_ACCOUNT> \
  --miner-id 1 \
  --keypair /var/lib/hippius/miner/data/keypair.bin

# Example output:
# ━━━━━━━━━━━━━━━━━━━━━━━━━━━━━━━━━━━━━━━━━━━━━━━━━━━━
# MINER-1
# ━━━━━━━━━━━━━━━━━━━━━━━━━━━━━━━━━━━━━━━━━━━━━━━━━━━━
# family:    5GrwvaEF5zXb26Fz9rcQpDWS57CtERHpNehXCPcNoHGKutQY
# child:     5FHneW46xGXgs5mUiveU4sbTyGBzmstUspZC92UhjJM694ty
#
# node_id:   0x70d27c756b0f9a71fc89a6e571c9bdf9e63f8531e125714d0f164be0e11e6846
# node_sig:  0x123abc...def (64 bytes)
#
# WARNING: These values are for one-time registration. Do not share publicly.
Step 3: Register Miner in Arion Pallet
Now register your miner in the Arion pallet using the signature generated in Step 2.
- Navigate to Polkadot.js Apps
- Go to Developer → Extrinsics
- Select your coldkey account (family/main account)
- Choose pallet: arion
- Choose extrinsic: registerChild
- Fill in the parameters (copy from Step 2 tool output):
family: Your coldkey account address (AccountId32) - this is your main account for staking and governancechild: Your hotkey account address (AccountId32) - this is the child account that will be used for mining operationsnodeId: Thenode_idfrom tool output (paste the full0x...hex string as [u8;32])nodeSig: Thenode_sigfrom tool output (paste the full0x...hex string as [u8;64])
- Sign and submit the transaction
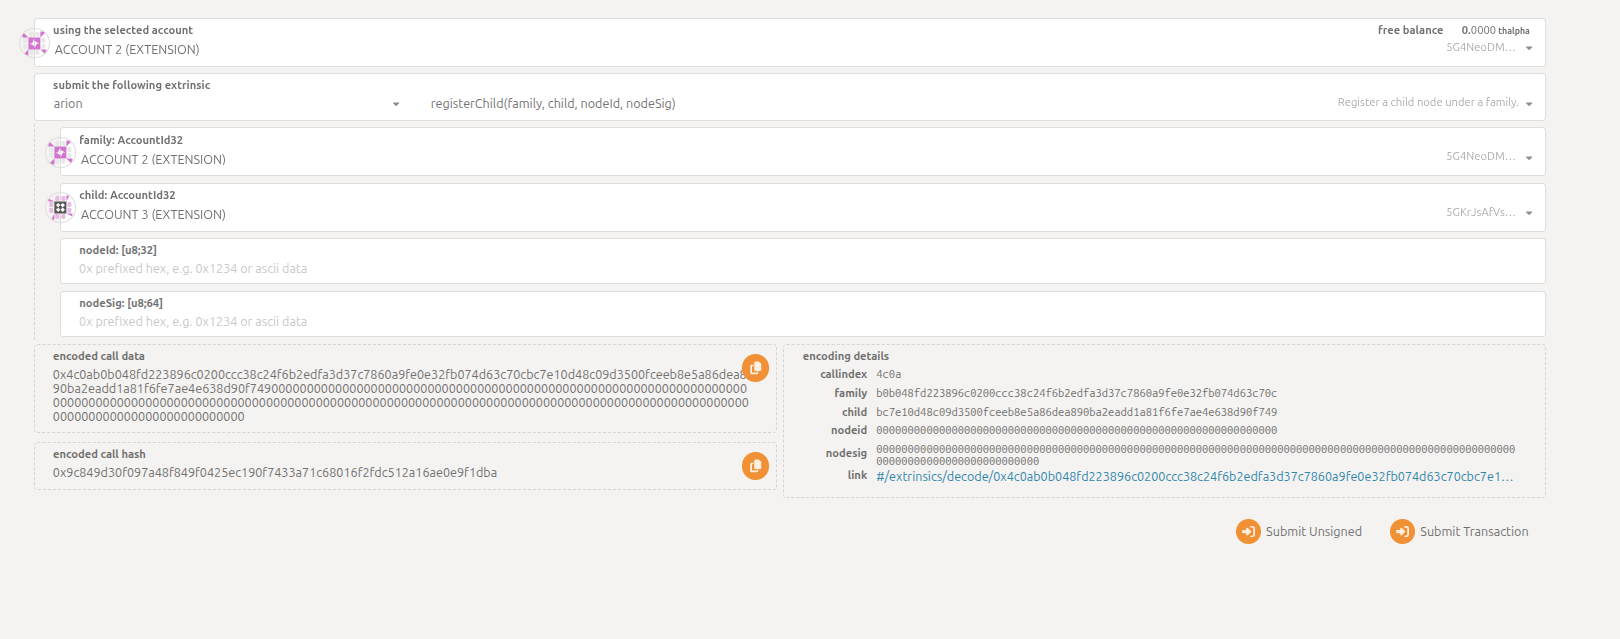
Make sure to copy the exact node_id and node_sig values from the generate_registration_data tool output. These are cryptographically linked and must match exactly.
Step 4: Wait for Chain Registry Update
Wait for the validator's chain-registry-cache to refresh (default poll is every 30s) and re-check miner logs.
7. Verify Registration
Check miner logs:
journalctl -u hippius-miner -f
Look for:
✅ Registered with validator via P2P
8. Monitor Health
# Check service status
sudo systemctl status hippius-miner

# View recent logs
journalctl -u hippius-miner --since "5 minutes ago"

# Check blob storage
ls -la /var/lib/hippius/miner/data/blobs/
9. Deregistering a Miner
If you need to deregister your miner from the network, you can do so through the Arion pallet. The deregistration process involves two steps:
- Deregister - Unregister the miner and enter unbonding period
- Claim Unbonded - Claim your deposit after the unbonding period ends
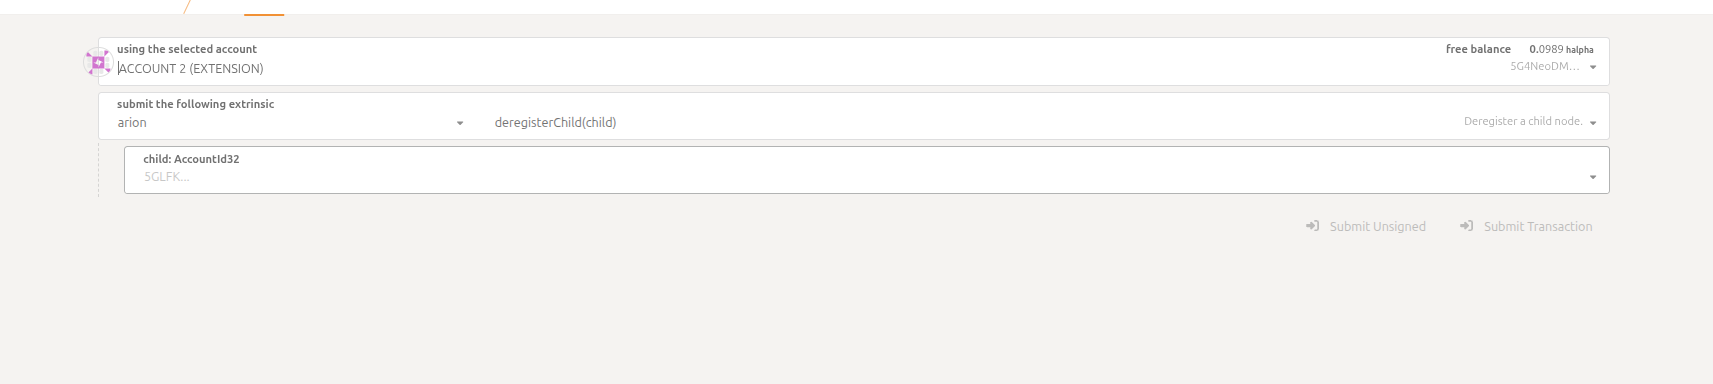
Step 1: Deregister Child (Miner)
This will unregister your miner from the network and start the unbonding period for your deposit.
- Navigate to Polkadot.js Apps
- Go to Developer → Extrinsics
- Select your coldkey account (family/main account)
- Choose pallet: arion
- Choose extrinsic: deregisterChild
- Fill in the parameters:
child: Your hotkey account address (AccountId32) - the child account used for mining operations
- Sign and submit the transaction
Once you deregister your miner:
- The miner will be immediately unregistered from the network
- Your miner will stop receiving storage assignments
- Your deposit will enter an unbonding period (configured by the chain)
- You cannot re-register the same child account until the cooldown period expires
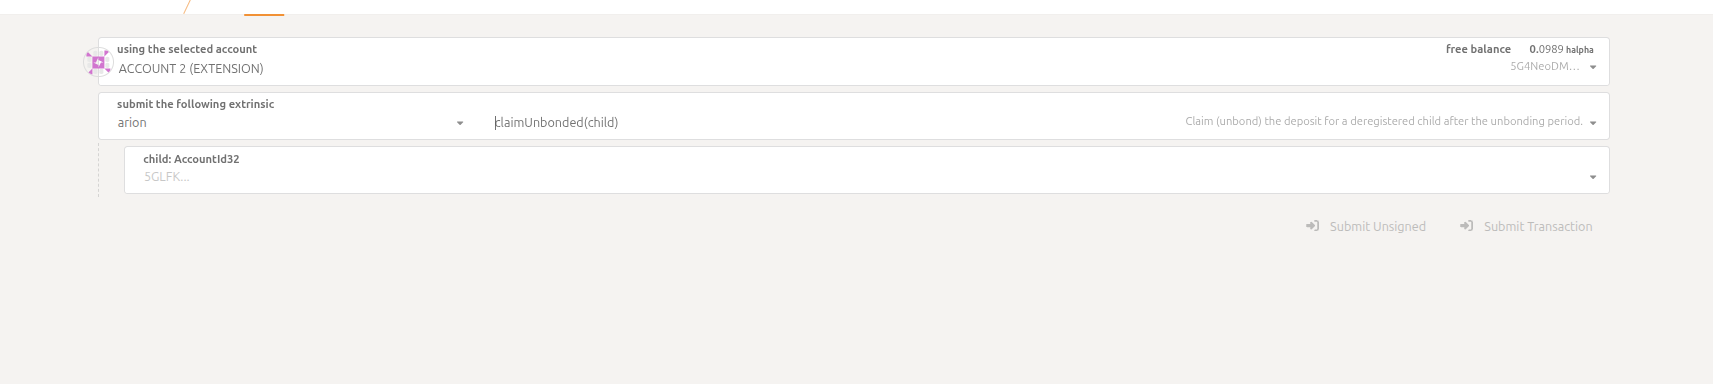
Step 2: Claim Unbonded Deposit
After the unbonding period has ended, you can claim your deposit back.
- Navigate to Polkadot.js Apps
- Go to Developer → Extrinsics
- Select your coldkey account (family/main account)
- Choose pallet: arion
- Choose extrinsic: claimUnbonded
- Fill in the parameters:
child: Your hotkey account address (AccountId32) - the same child account you deregistered
- Sign and submit the transaction
The unbonding period is set by the chain configuration and may vary. During this period:
- Your deposit remains locked and cannot be claimed
- The child account remains in cooldown and cannot be re-registered
- After the period ends, you can call
claimUnbondedto release your deposit
To check if your unbonding period has ended, you can query the chain state in Polkadot.js Apps:
- Go to Developer → Chain State
- Select arion pallet
- Select childRegistrations(AccountId32) storage
- Enter your child account address to check the
unbonding_endblock number
Configuration Options
| Option | Env Var | Description | Default |
|---|---|---|---|
--validator-node-id | VALIDATOR_NODE_ID | Validator P2P node ID | Required |
| - | WARDEN_NODE_ID | Warden P2P node ID (for PoS audits) | Required |
--port | PORT | HTTP listen port | 3001 |
--hostname | HOSTNAME | Public IP/hostname | Required |
--storage-path | STORAGE_PATH | Data directory | data |
--max-storage | MAX_STORAGE | Max storage bytes | Required |
--family-id | FAMILY_ID | Miner family group | default |
--relay-url | RELAY_URL | Custom relay (optional) | Iroh public |
Troubleshooting
"Connection refused" to Validator
- Check firewall: validator P2P UDP port must be open (validator is typically reachable via relay too)
- Verify validator is running:
curl http://<validator>:3002/map
"Rate limited" on registration
- Normal when retrying too quickly; the miner backs off and retries automatically.
Miner not receiving shards
- Verify P2P port 4433 is open and accessible
- Check that hostname resolves to correct public IP
Backup & Recovery
# Backup keypair (important!)
cp /var/lib/hippius/miner/data/keypair.bin ~/miner-keypair-backup.bin

# Restore on new machine
cp ~/miner-keypair-backup.bin /var/lib/hippius/miner/data/keypair.bin
The keypair determines your miner's node ID - losing it means re-registering as a new miner.
Once your miner is registered and running, your rewards depend on bandwidth served, storage held, and uptime. The system recalculates weights every 6 hours and distributes rewards automatically. See How Weights & Rewards Work for the full details.