Virtual Machines
Introduction
The Virtual Machines section allows you to create and manage compute instances within Hippius. This guide covers essential tasks for launching and operating VMs.
Virtual Machines is currently available only to beta users. To request access, please contact the Hippius admin team.
Create a Virtual Machine
You need at least 10 credits in your account to create a virtual machine. Make sure you have sufficient credits before proceeding.
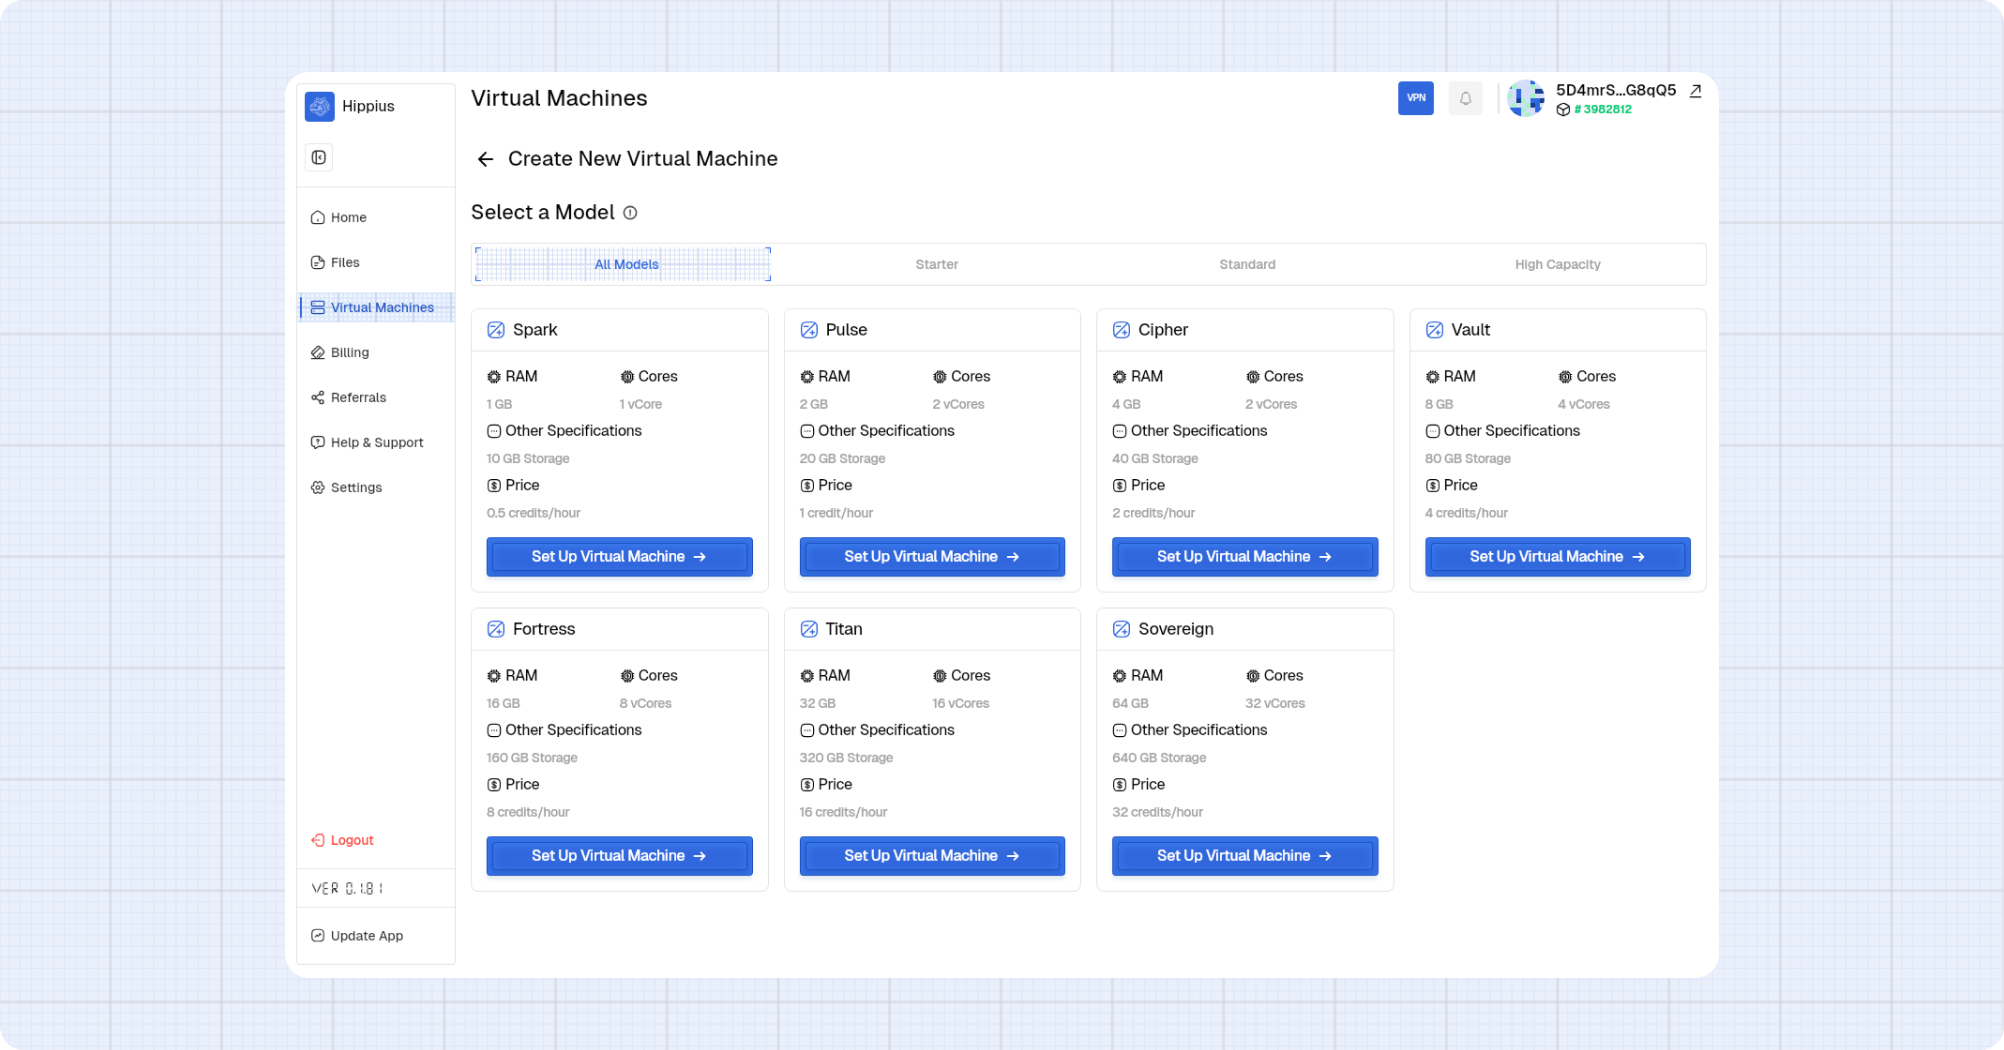
Start by clicking the top-right Create VM button, then select the model that fits your needs and continue with the setup.
Step 1: Configure the VM
Complete the model configuration details.
- Click Set Up Virtual Machine on a model card or Create VM.
- Enter a name for your instance.
- Select an Operating System.
- Select an Image for the OS you picked.
- (Optional) Choose an Application, such as Docker.
- Select an SSH Key to access the VM. If you do not have one, click Create New SSH Key.
- Click Next.

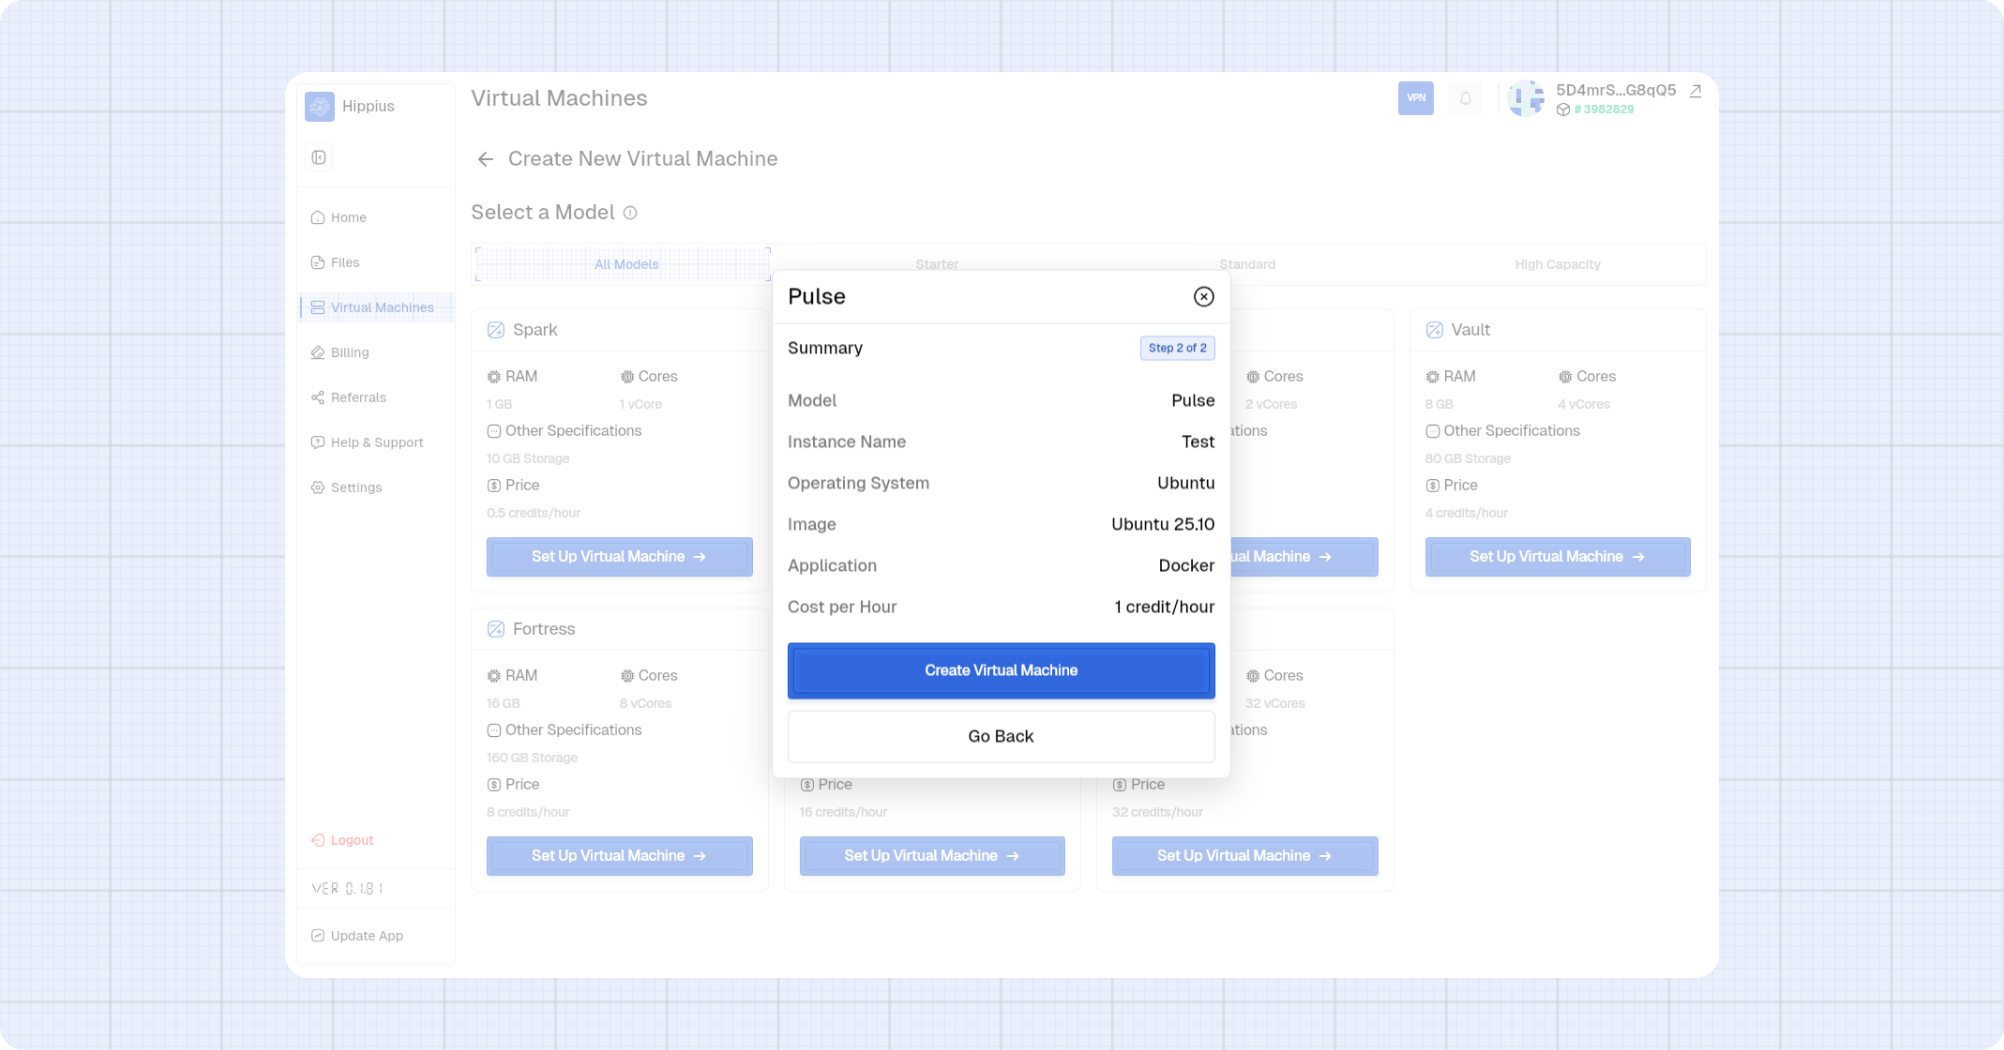
Step 2: Review and create
Review the summary and create the VM.
- Confirm the model, OS, image, application, and hourly cost.
- Click Create Virtual Machine to launch the instance.
- Use Go Back if you need to edit any settings.
SSH Keys
SSH keys are required to securely access your instances. Manage all keys in the SSH Keys tab.
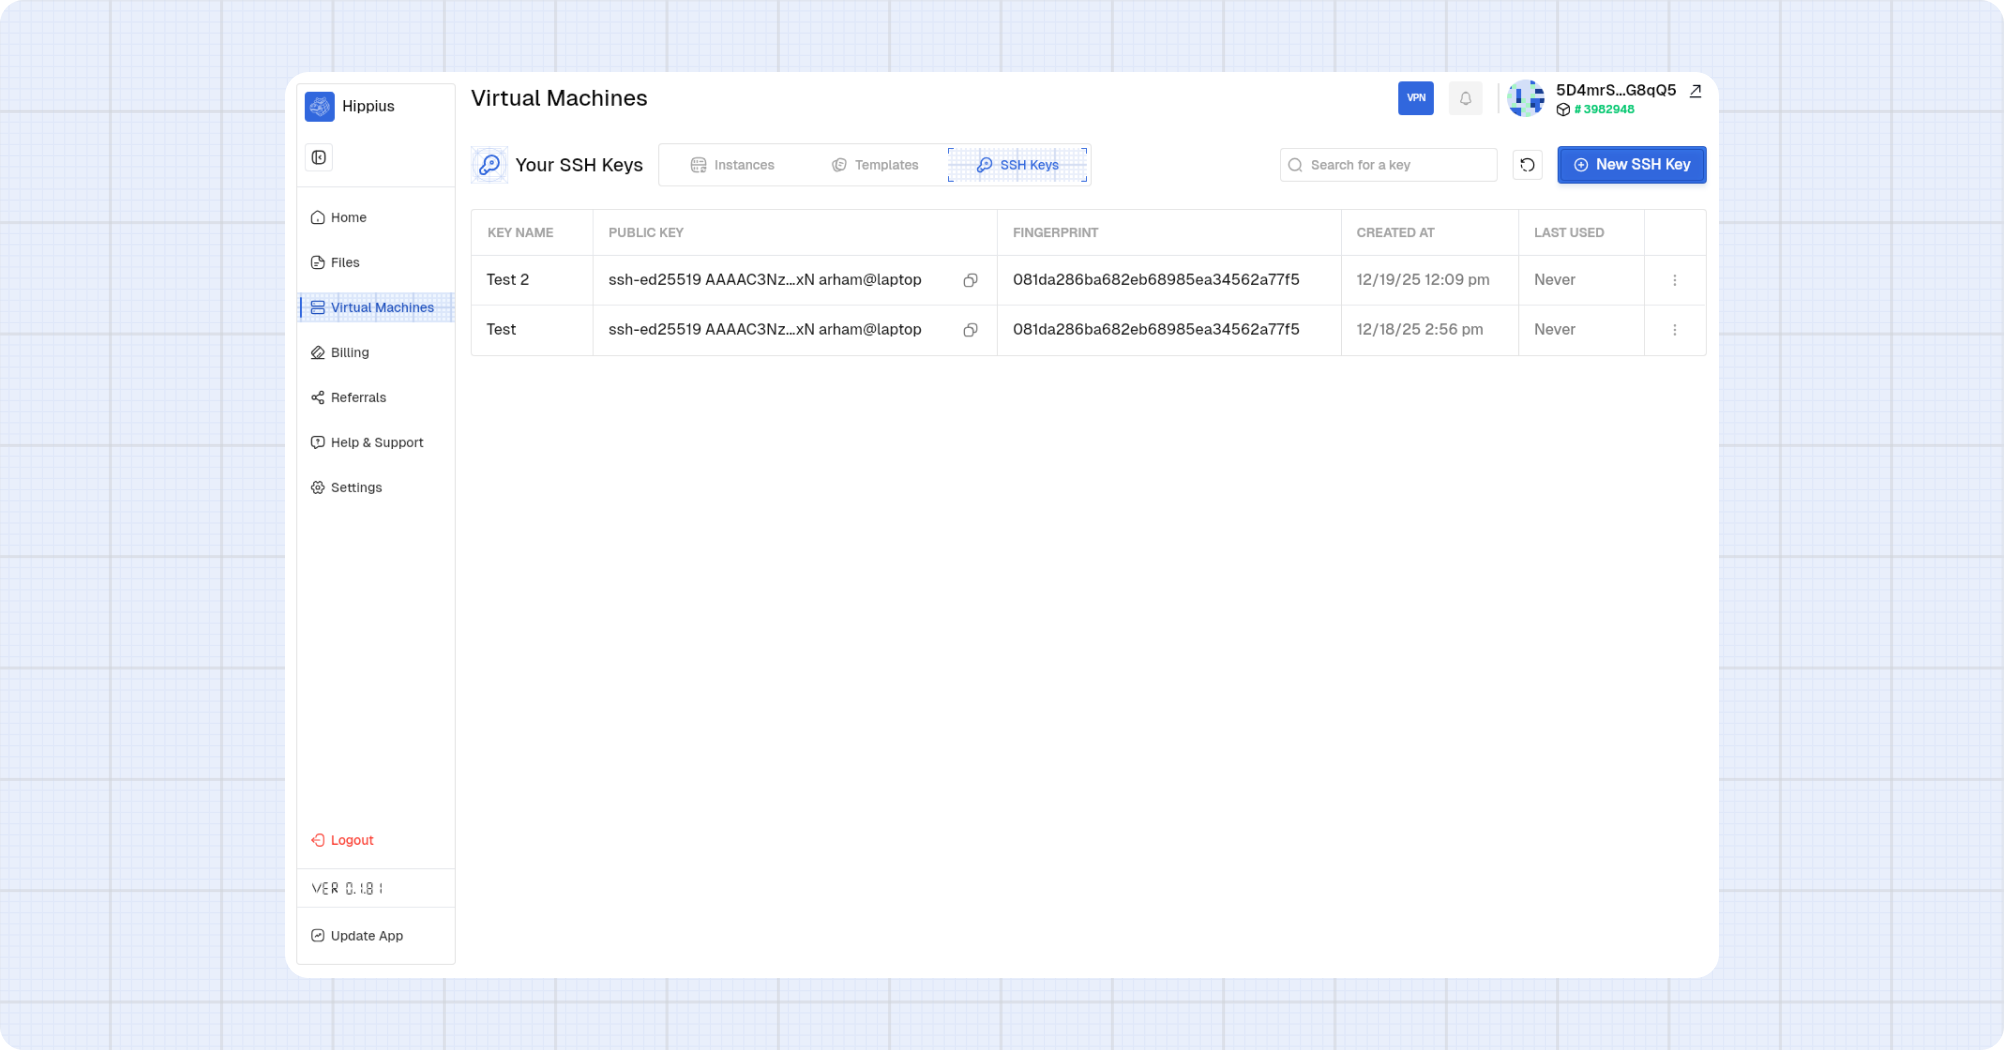
Note: Only OpenSSH public keys are supported (for example, ssh-rsa or ssh-ed25519). Never share or paste your private key.
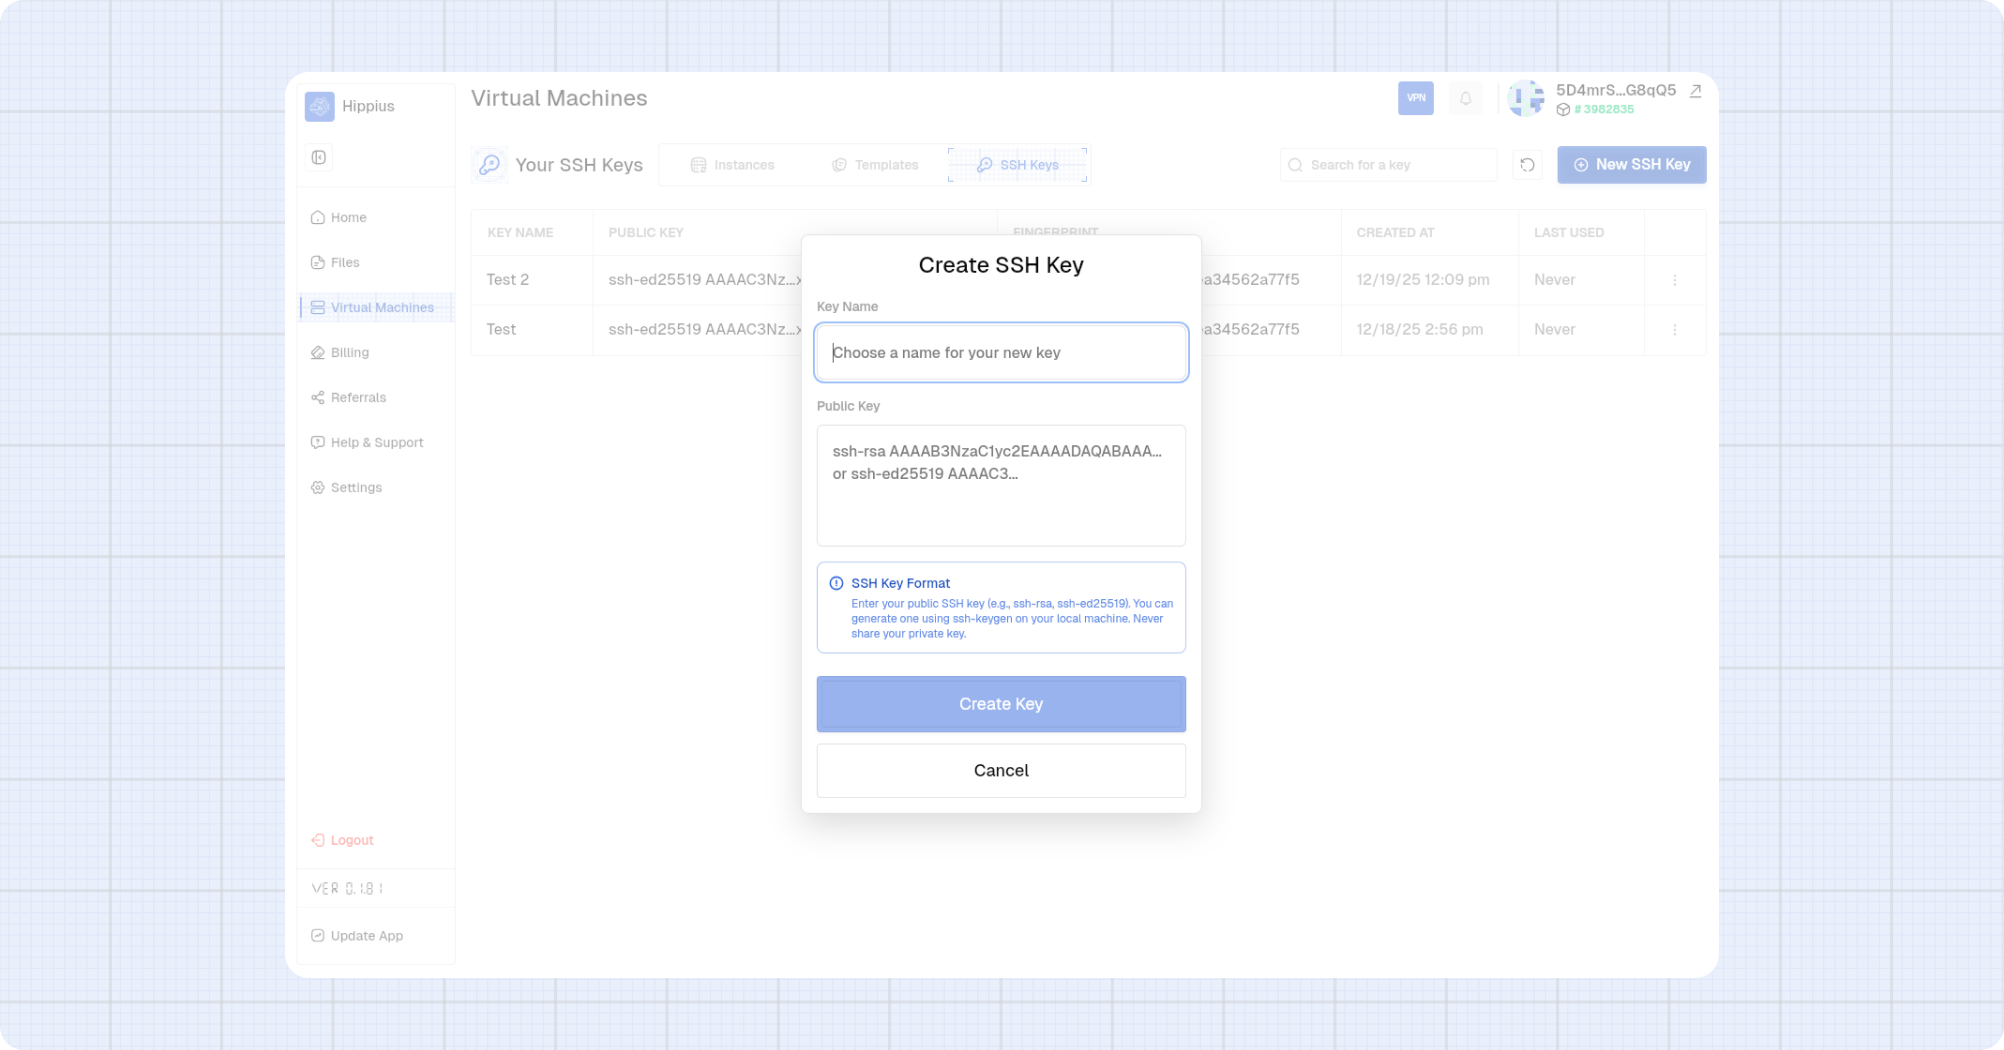
Create an SSH Key
- Open the SSH Keys tab.
- Click New SSH Key.
- Enter a Key Name.
- Paste your OpenSSH public key.
- Click Create Key.
Generate an SSH Key Pair with ssh-keygen
The OpenSSH ssh-keygen utility is used to generate SSH key pairs. Run it on your local computer to generate a key pair.
On macOS or Linux
Open Terminal and run:
ssh-keygen
The utility prompts you to select a location for the keys:
Generating public/private ed25519 key pair.
Enter file in which to save the key (/home/username/.ssh/id_ed25519):
By default, the keys are stored in the ~/.ssh directory with the filenames id_ed25519 for the private key and id_ed25519.pub for the public key. Using the default locations allows your SSH client to automatically find your SSH keys when authenticating, so we recommend accepting them by pressing ENTER.
Warning: If you have previously generated a key pair, you may see a prompt asking if you want to overwrite the existing key. If you choose to overwrite the key on disk, you will no longer be able to authenticate using the previous key.
Next, you'll be prompted to enter an optional passphrase which encrypts the private key file on disk:
Enter passphrase (empty for no passphrase):
Enter same passphrase again:
If you enter a passphrase, you'll need to provide it every time you use this key (unless you're running SSH agent software). We recommend using a passphrase for added security, but you can press ENTER to skip this step.
You now have a public and private key pair. The output will look like this:
Your identification has been saved in /home/username/.ssh/id_ed25519.
Your public key has been saved in /home/username/.ssh/id_ed25519.pub.
The key fingerprint is:
SHA256:EXAMPLEKEYFINGERPRINTfH8/oLbXHnxvC0Ew username@hostname
To view your public key, run:
cat ~/.ssh/id_ed25519.pub
Copy the entire output and paste it into Hippius when creating an SSH key.
On Windows
Open PowerShell and run:
ssh-keygen
The utility prompts you to select a location for the keys:
Generating public/private ed25519 key pair.
Enter file in which to save the key (C:\Users\username\.ssh\id_ed25519):
Press ENTER to accept the default location. The keys will be stored in the C:\Users\username\.ssh directory.
Next, you'll be prompted to enter an optional passphrase:
Enter passphrase (empty for no passphrase):
Enter same passphrase again:
We recommend using a passphrase for added security, but you can press ENTER to skip this step.
To view your public key, run:
type C:\Users\username\.ssh\id_ed25519.pub
Replace username with your actual Windows username. Copy the entire output and paste it into Hippius when creating an SSH key.
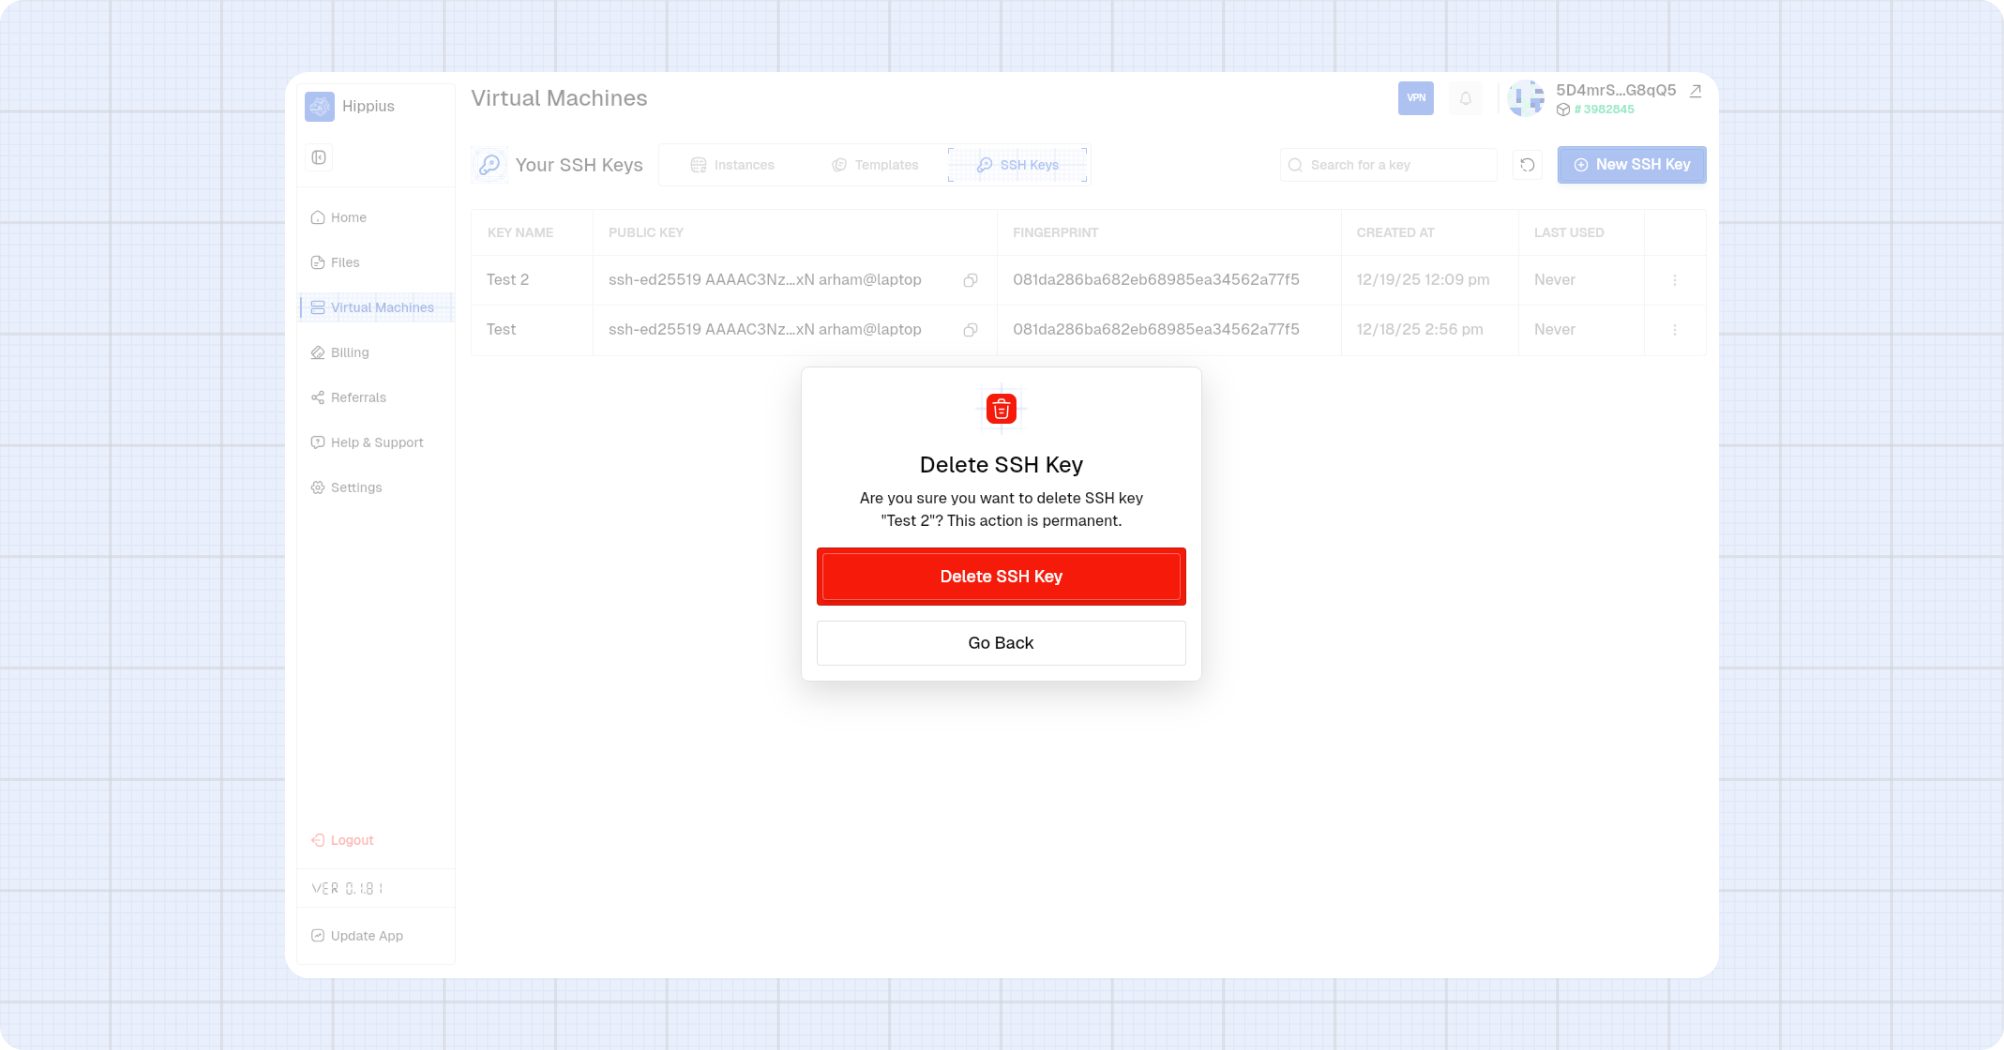
Delete an SSH Key
- Open the key options menu on the row you want to remove.
- Select Delete SSH Key.
- Confirm deletion in the modal.
Connect to Your VM via SSH
Once your VM is running, you can connect to it using SSH from your local terminal.
Getting VM Connection Details
Each running VM displays its connection information in the instance list:
- Nebula IP: Use this IP address to connect to your VM (shown in the "NEBULA IP" column)
- SSH User: The default username is
hippiusfor all VMs
Connecting from macOS or Linux
Open Terminal and use the following command:
ssh hippius@nebula_ip
Replace nebula_ip with your VM's Nebula IP address from the instance list. For example:
If you used a custom location for your SSH key, specify it with the -i flag:
ssh -i ~/.ssh/id_ed25519 hippius@nebula_ip
If you set a passphrase when creating your SSH key, you'll be prompted to enter it.
Connecting from Windows
Open PowerShell and use the same command as macOS/Linux:
ssh hippius@nebula_ip
For example:
If you stored your key in a custom location:
ssh -i C:\Users\username\.ssh\id_ed25519 hippius@nebula_ip
If you set a passphrase when creating your SSH key, you'll be prompted to enter it.
Troubleshooting SSH Connection Issues
Permission Denied (publickey)
This error means your SSH key isn't recognized:
- Verify you added the correct public key to Hippius.
- Check that you're using the matching private key when connecting.
- Ensure your private key has the correct permissions:
chmod 600 ~/.ssh/id_ed25519
Connection Timeout
If the connection times out:
- Verify your VM is in the "Running" state.
- Check that you're using the correct Nebula IP address from the instance list.
- Ensure your local firewall isn't blocking outbound SSH connections.
Wrong Username
The default username for all Hippius VMs is hippius. If you're getting authentication errors, make sure you're using:
ssh hippius@your_nebula_ip
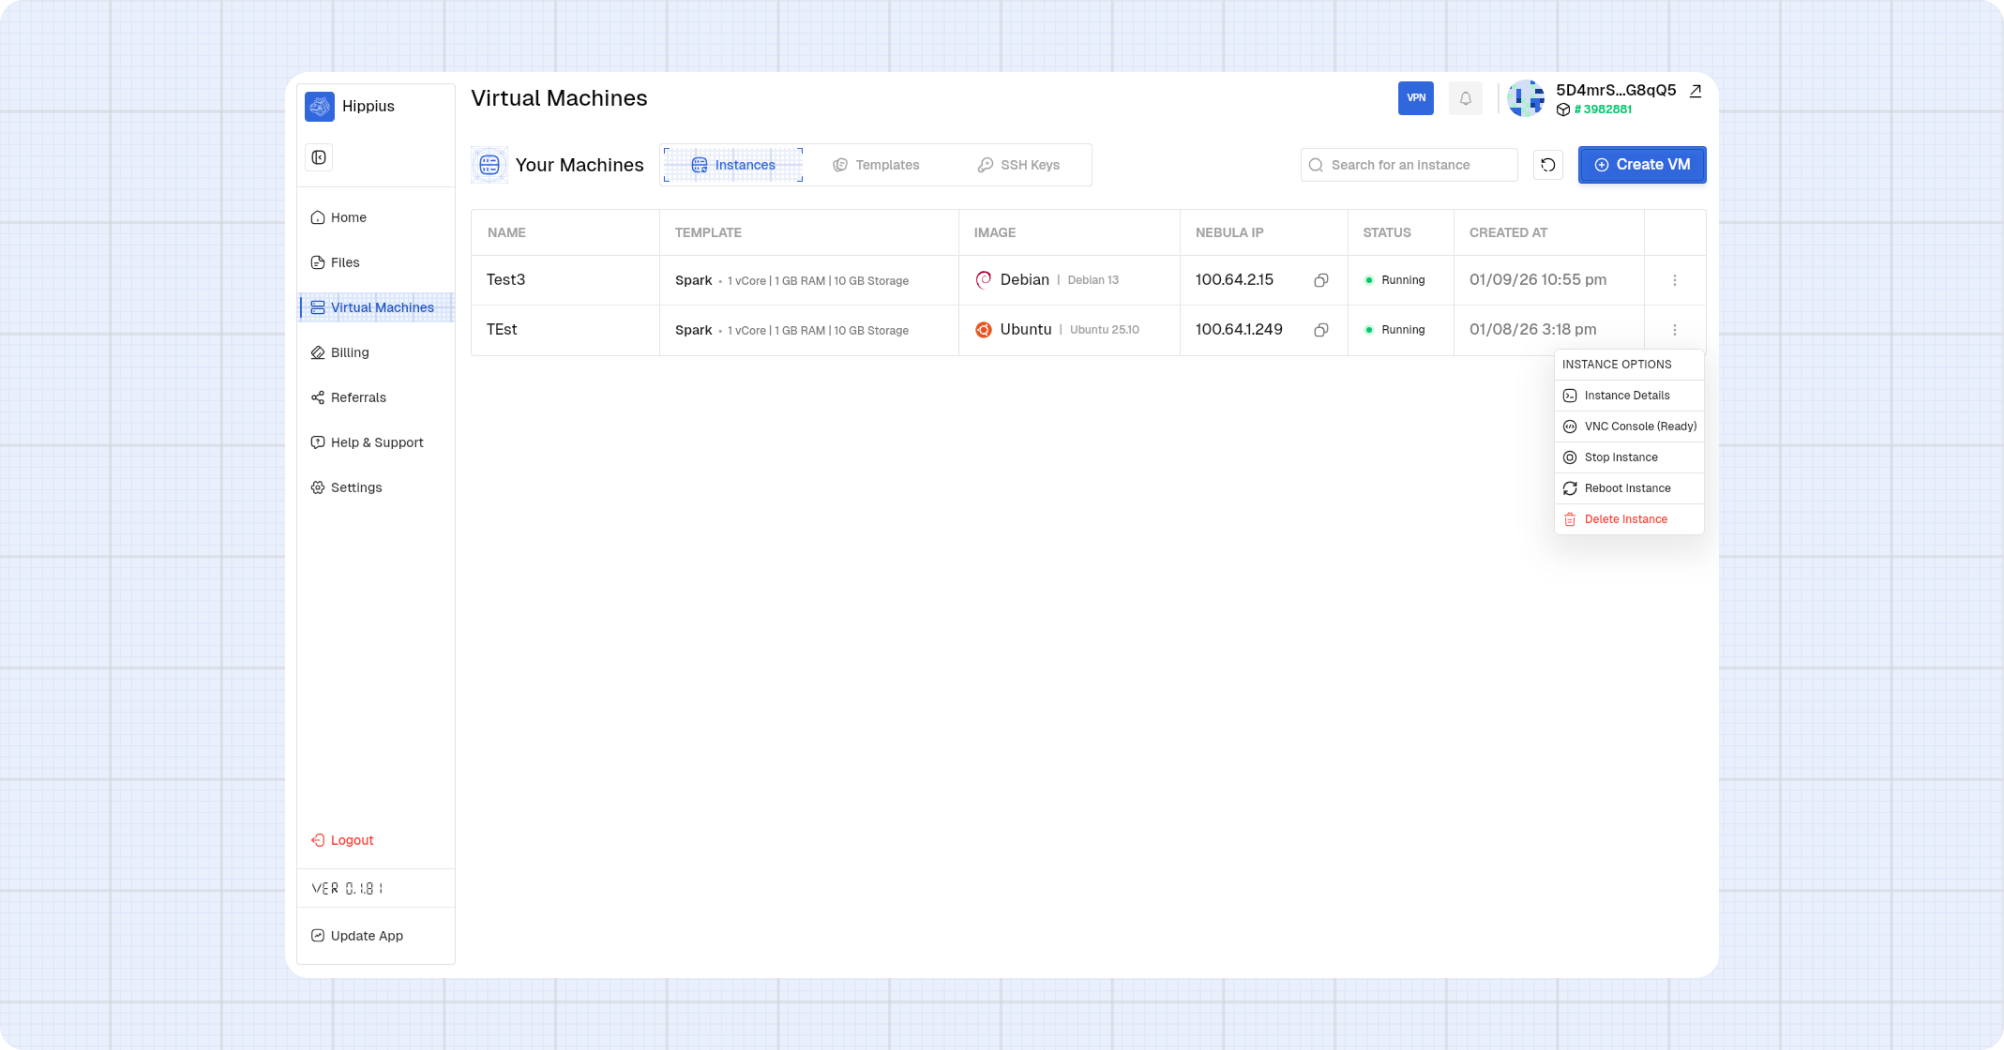
Manage Instances
Use the instance options menu to perform actions on a VM.
Access Console
Coming Soon: Console access is currently under development and will be available in a future release.
Start an instance
If an instance is stopped, the options menu will show a start action.
- Open the instance options menu.
- Select Start Instance.
- Wait for the status to change to Running.
Stop an instance
- Open the instance options menu.
- Select Stop Instance.
- Confirm the action.
Reboot an instance
- Open the instance options menu.
- Select Reboot Instance.
- Confirm the action.
Delete an instance
- Open the instance options menu.
- Select Delete Instance.
- Confirm the action.